通过 Unity 2021.2 版本起内置的 UI Toolkit 和 UI Builder 制作了一个物品编辑器,过程参考学习了 B 站 Up 主M_Studio老师在 Unity 中文课堂发布的 “《麦田物语》模拟经营游戏开发教程” 中第 13~17 讲,然后额外增加了查询和排序功能,虽然我实现的很简单,但这也算是我在博客第一次写游戏开发的日记,主要记录我的成长历程和开发经验,便于我以后的总结。
准备工作
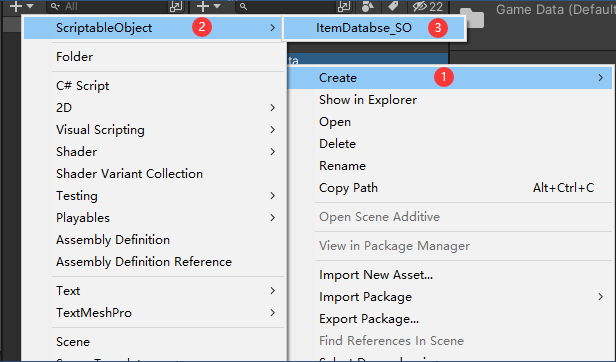
创建存储物品 Item 的数据库(ScriptableObject)
我们这个编辑器因为是要基于 ScriptableObject 数据进行展示和操作的,所以要先创建一个存储物品数据库的 ScriptableObject 文件
创建 ScriptableObject 文件过程,先创建一个 c#脚本,打开脚本后将当前类继承与ScriptableObject类,并且还需添加“[CreateAssetMenu()]”特性(Attribute),
其中的参数 fileName:新建出来的 ScriptableObject 文件的名称;menuName:创建菜单的级别目录
using System.Collections.Generic;
using UnityEngine;

[CreateAssetMenu(fileName = "ItemDatabse_SO", menuName = "ScriptableObject/ItemDatabse_SO")]
public class ItemDatabse_SO : ScriptableObject
{
    public List<Item> itemList;
}

// *道具
[System.Serializable]
public class Item
{
    // 尽量用不同的数据类型展示
    public int id;
    public string itemName;
    public Sprite image;
    public ItemActionType actionType;
    [TextArea] public string details;
}

// *物品操作类型
public enum ItemActionType
{
    None,   // 无操作
    Use     // 使用
}
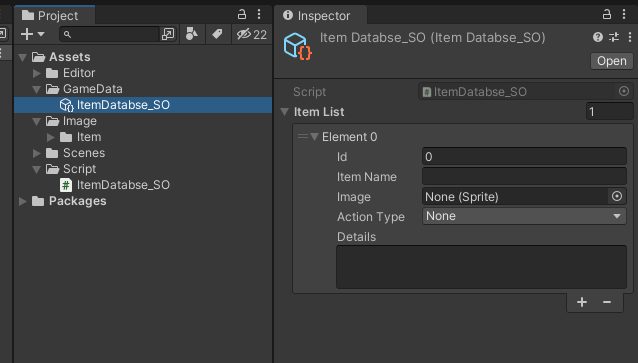
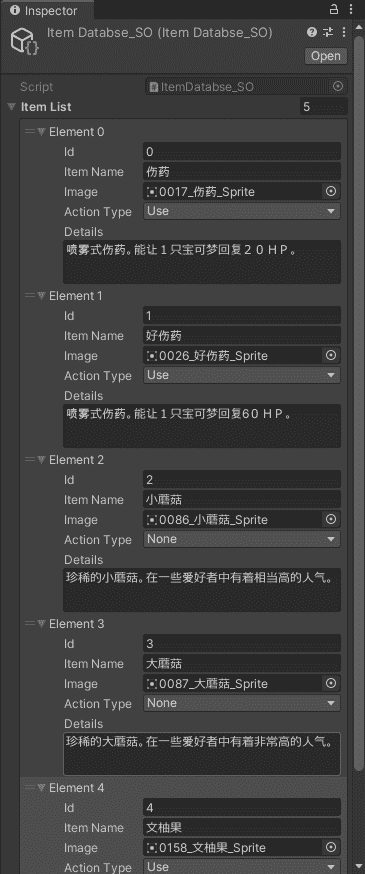
还需要添加一些物品数据,这样数据就准备完成了!
创建 Editor Window
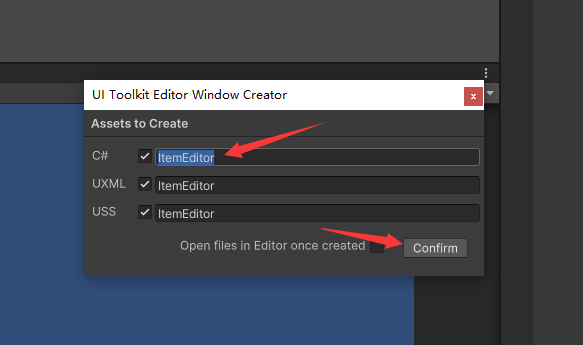
在 Unity 你现有的项目或者新项目中找到 Assets/Editor 文件夹,没有的话可以手动创建,然后在 Editor 文件夹中最好再创建一个文件夹便于管理,然后再新建的文件夹上右键—>Create—>UI Toolkit—>Editor Window

然后输入名称点击 Confirm 确定
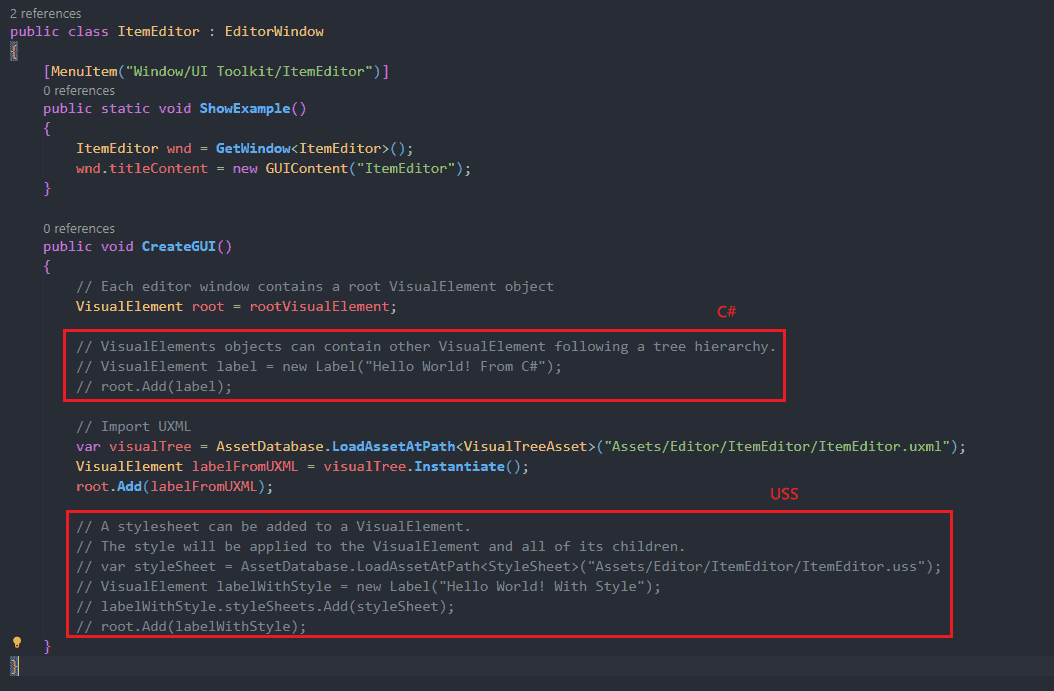
接下来会自动创建三个文件,并弹出一个编辑器的窗口,这三个文件分别以.cs、.uss、.uxml 为后缀名
- .cs:当然就是 C#的脚本文件了
- .uss:可以修改 UI Toolkit 控件的样式,用于设置元素的尺寸以及元素在屏幕上的绘制方式,例如
backgroundColor或borderColor。,类似于 html 中的 css - .uxml:可扩展标记语言 (UXML) 文件是定义用户界面逻辑结构的文本文件,用于做出编辑器的 UI 界面
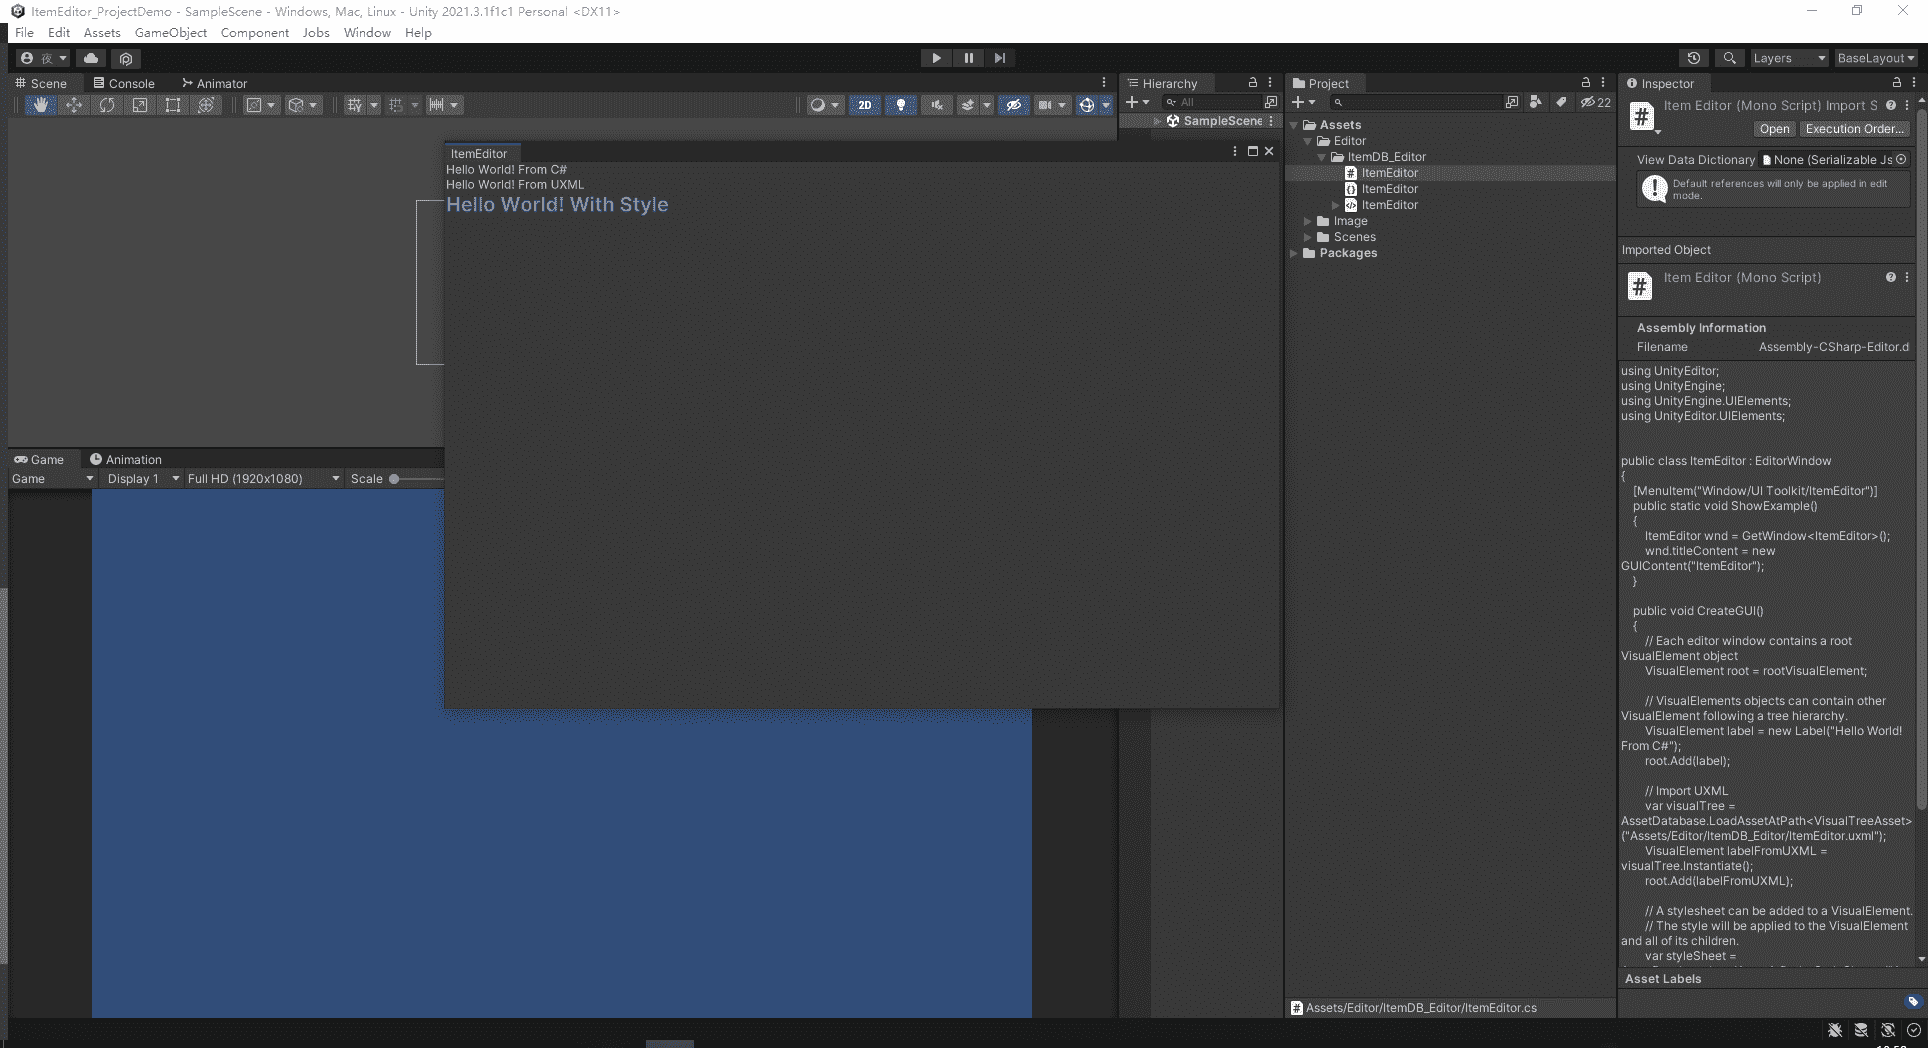
这样就相当于 Editor Window 创建成功了,还需要使用 UI Builder 通过图形化的方式对编辑器进行数据显示的布局。
设计布局
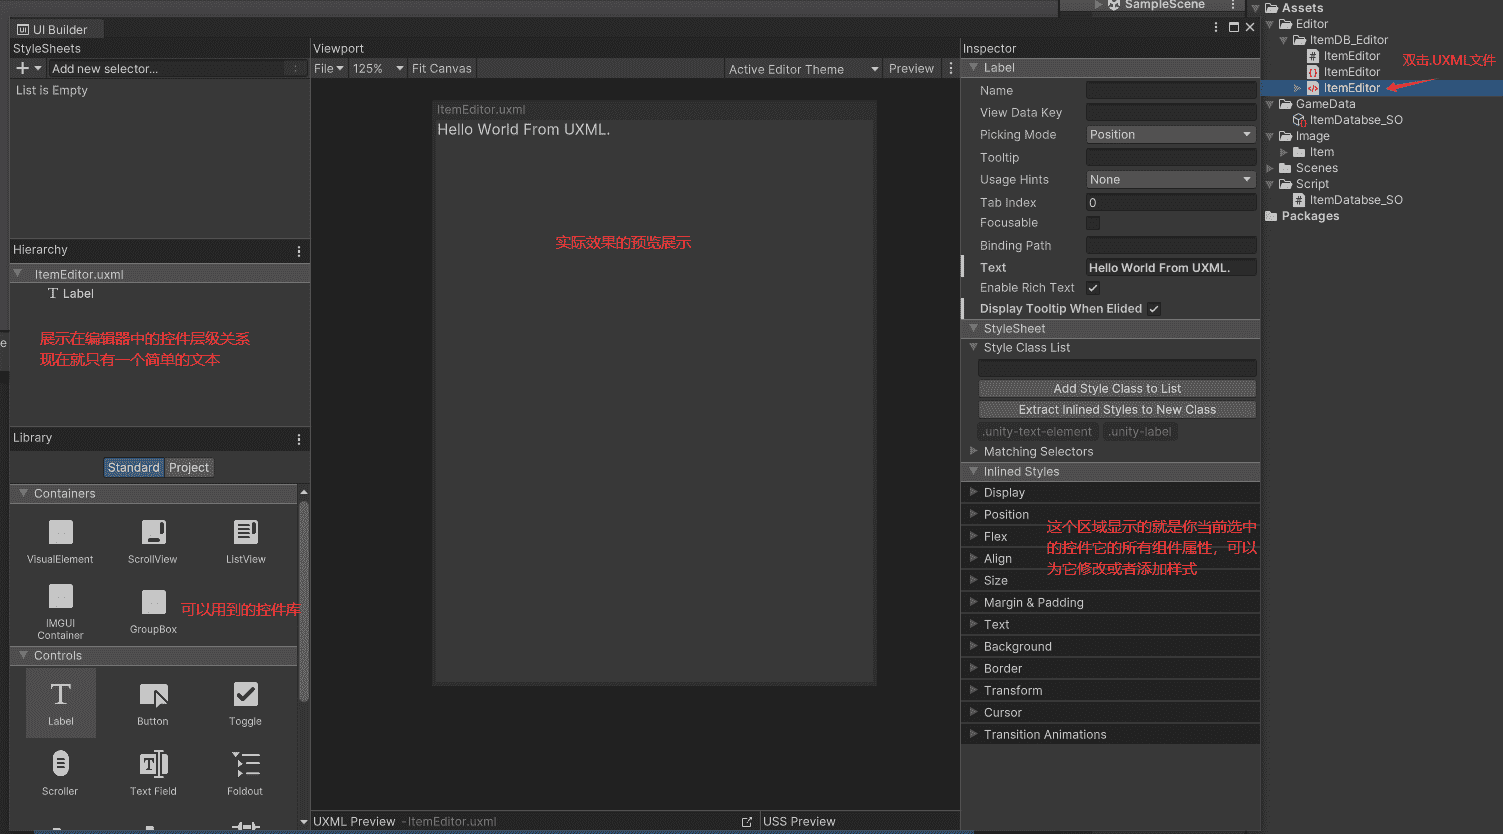
编辑界面
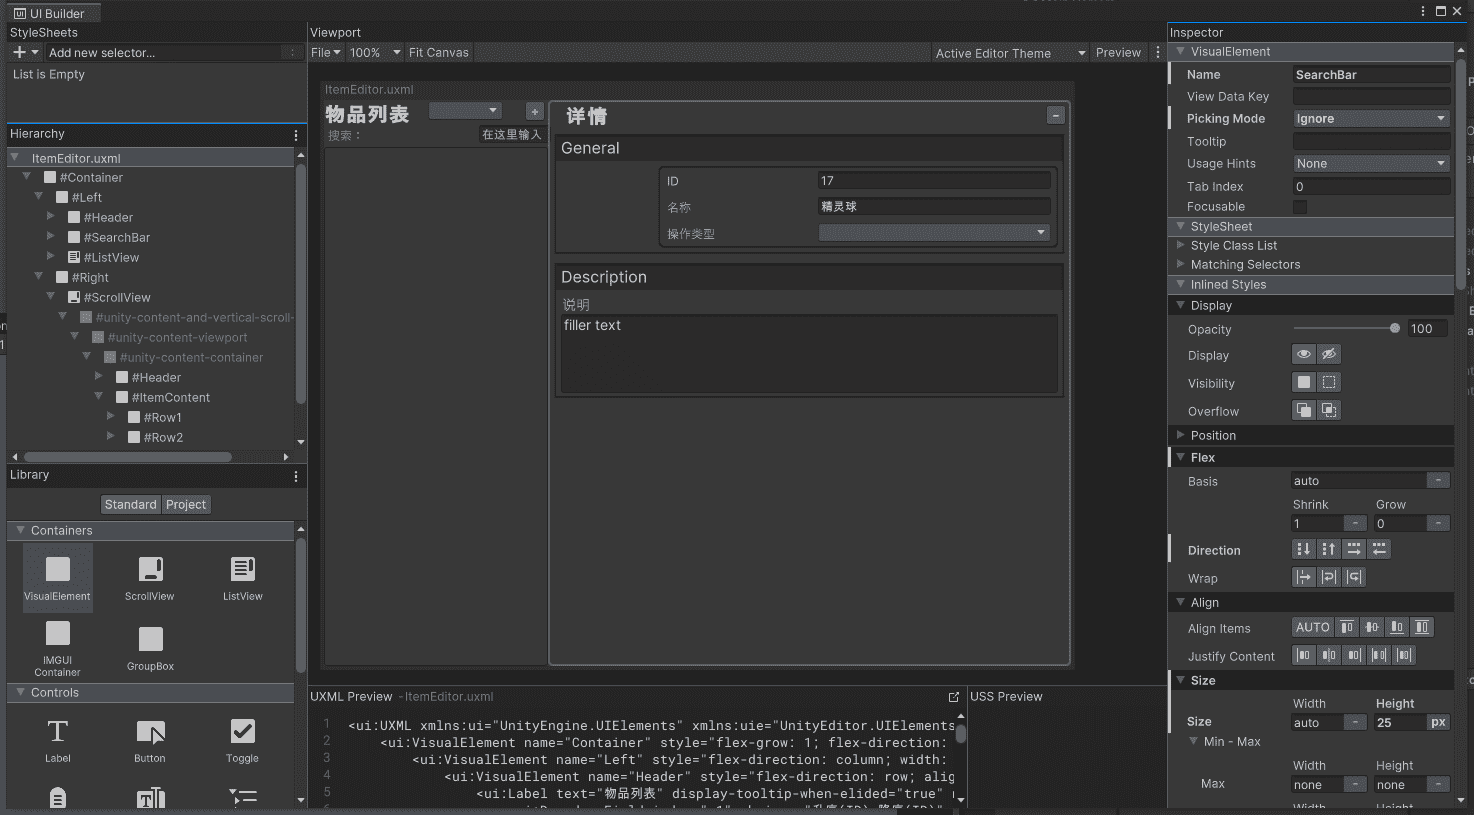
可以选择在这个 UI Builder 界面自己拖组件形成界面,也可以通过敲代码的形成界面,就像写 html 代码一样,我这里先贴出来我的最终效果的代码。
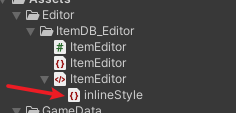
使用方式就是复制粘贴到.uxml 文件下的 inlineStyle 文件中。
<ui:UXML
xmlns:ui="UnityEngine.UIElements"
xmlns:uie="UnityEditor.UIElements"
xsi="http://www.w3.org/2001/XMLSchema-instance"
engine="UnityEngine.UIElements"
editor="UnityEditor.UIElements"
noNamespaceSchemaLocation="../../../UIElementsSchema/UIElements.xsd"
editor-extension-mode="True"
>
<ui:VisualElement
name="Container"
style="flex-grow: 1; flex-direction: row; min-width: 700px; min-height: 550px;"
>
<ui:VisualElement
name="Left"
style="flex-direction: column; width: 30%; height: 100%; -unity-font-definition: none; -unity-font: url('project://database/Library/unity%20default%20resources?fileID=10102&guid=0000000000000000e000000000000000&type=0#Arial');"
>
<ui:VisualElement
name="Header"
style="flex-direction: row; align-items: center; justify-content: space-between;"
>
<ui:Label
text="物品列表"
display-tooltip-when-elided="true"
name="itemList"
style="font-size: 20px; -unity-font-style: bold;"
>
<ui:DropdownField
index="-1"
choices="升序(ID),降序(ID)"
tabindex="0"
name="Sort"
style="justify-content: center; align-items: center; flex-direction: row; margin-left: 3px; padding-left: 100px; height: 20px; width: 175px; font-size: 12px; -unity-font-style: normal;"
/>
</ui:Label>
<ui:Button
text="+"
display-tooltip-when-elided="true"
name="AddButton"
style="width: 20px; height: 20px;"
/>
</ui:VisualElement>
<ui:VisualElement
picking-mode="Ignore"
name="SearchBar"
style="height: 25px; flex-direction: row;"
>
<ui:TextField
label="搜索:"
text="在这里输入"
tooltip="输入你要搜索的物品名或者ID"
focusable="true"
max-length="-1"
password="false"
name="Search"
/>
</ui:VisualElement>
<ui:ListView
focusable="true"
show-border="true"
name="ListView"
reorderable="true"
show-add-remove-footer="false"
style="flex-grow: 1; border-right-color: rgb(135, 135, 135); border-left-color: rgb(135, 135, 135); border-top-color: rgb(135, 135, 135); border-bottom-color: rgb(135, 135, 135); -unity-text-outline-color: rgb(0, 0, 0); color: rgb(210, 210, 210); border-left-width: 0; border-right-width: 0; border-top-width: 0; border-bottom-width: 0;"
/>
</ui:VisualElement>
<ui:VisualElement
name="Right"
style="max-width: 100%; max-height: 100%; width: 70%;"
>
<ui:ScrollView
name="ScrollView"
style="width: 100%; height: 100%; border-left-width: 2px; border-right-width: 2px; border-top-width: 2px; border-bottom-width: 2px; border-left-color: rgb(101, 101, 101); border-right-color: rgb(101, 101, 101); border-top-color: rgb(101, 101, 101); border-bottom-color: rgb(101, 101, 101); border-top-left-radius: 5px; border-bottom-left-radius: 5px; border-top-right-radius: 5px; border-bottom-right-radius: 5px;"
>
<ui:VisualElement
name="Header"
style="flex-direction: row; justify-content: space-between; align-items: center;"
>
<ui:Label
text=" 详情"
display-tooltip-when-elided="true"
name="ItemDescription"
style="font-size: 20px; -unity-font-style: bold;"
/>
<ui:Button
text="-"
display-tooltip-when-elided="true"
name="DeleteButton"
style="font-size: 16px; height: 20px; width: 20px;"
/>
</ui:VisualElement>
<ui:VisualElement name="ItemContent" style="flex-grow: 1;">
<ui:VisualElement
name="Row1"
style="margin-left: 5px; margin-right: 5px; margin-top: 5px; margin-bottom: 5px; border-left-width: 1px; border-right-width: 1px; border-top-width: 1px; border-bottom-width: 1px; border-left-color: rgb(0, 0, 0); border-right-color: rgb(0, 0, 0); border-top-color: rgb(0, 0, 0); border-bottom-color: rgb(0, 0, 0);"
>
<ui:VisualElement
style="align-items: center; justify-content: space-between; flex-direction: row; min-width: 372px; width: auto; flex-shrink: 0; left: 0; top: 0; right: 0; bottom: 0; opacity: 1;"
>
<ui:Label
text="General"
display-tooltip-when-elided="true"
name="Title"
style="-unity-text-outline-color: rgb(0, 0, 0); background-color: rgb(43, 42, 42); font-size: 16px; padding-left: 5px; padding-top: 3px; padding-bottom: 3px; width: 100%; justify-content: flex-end; align-items: flex-start;"
/>
</ui:VisualElement>
<ui:VisualElement
name="Container"
style="border-left-color: rgb(0, 0, 0); border-right-color: rgb(0, 0, 0); border-top-color: rgb(0, 0, 0); border-bottom-color: rgb(0, 0, 0); flex-direction: row; align-items: center;"
>
<ui:VisualElement
name="Icon"
style="background-image: url('project://database/Assets/Image/Item/001-%E7%B2%BE%E7%81%B5%E7%90%83%E9%81%93%E5%85%B7%E7%AE%B1.png?fileID=21300000&guid=40bde5622593270468b52d158f5baff4&type=3#001-精灵球道具箱'); width: 80px; height: 80px; margin-left: 20px; margin-right: 20px; align-items: stretch; -unity-font-definition: none;"
/>
<ui:VisualElement
name="Gerneral"
style="margin-top: 5px; margin-bottom: 5px; margin-right: 5px; border-left-width: 1px; border-right-width: 1px; border-top-width: 1px; border-bottom-width: 1px; border-top-left-radius: 5px; border-bottom-left-radius: 5px; border-top-right-radius: 5px; border-bottom-right-radius: 5px; border-left-color: rgb(0, 0, 0); border-right-color: rgb(0, 0, 0); border-top-color: rgb(0, 0, 0); border-bottom-color: rgb(0, 0, 0); width: 100%;"
>
<uie:IntegerField
label="ID"
value="17"
name="ItemID"
style="padding-left: 3px; padding-right: 3px; padding-top: 3px; padding-bottom: 3px; -unity-text-align: middle-left;"
/>
<ui:TextField
picking-mode="Ignore"
label="名称"
value="filler text"
text="精灵球"
name="ItemName"
style="padding-left: 3px; padding-right: 3px; padding-top: 3px; padding-bottom: 3px; -unity-text-align: middle-left;"
/>
<uie:ObjectField
label="图像"
type="UnityEngine.Sprite, UnityEngine.CoreModule"
name="Image"
style="padding-left: 3px; padding-right: 3px; padding-top: 3px; padding-bottom: 3px; height: 23px;"
/>
<uie:EnumField
label="操作类型"
value="Center"
name="ActionType"
style="padding-left: 3px; padding-right: 3px; padding-top: 3px; padding-bottom: 3px; -unity-text-align: middle-left;"
/>
</ui:VisualElement>
</ui:VisualElement>
</ui:VisualElement>
<ui:VisualElement
name="Row2"
style="border-left-width: 1px; border-right-width: 1px; border-top-width: 1px; border-bottom-width: 1px; border-left-color: rgb(0, 0, 0); border-right-color: rgb(0, 0, 0); border-top-color: rgb(0, 0, 0); border-bottom-color: rgb(0, 0, 0); margin-left: 5px; margin-right: 5px; margin-top: 5px; margin-bottom: 5px;"
>
<ui:Label
text="Description"
display-tooltip-when-elided="true"
name="Title"
style="-unity-text-outline-color: rgb(0, 0, 0); background-color: rgb(43, 42, 42); font-size: 16px; padding-left: 5px; padding-top: 3px; padding-bottom: 3px;"
/>
<ui:VisualElement name="Container">
<ui:TextField
picking-mode="Ignore"
label="说明"
value="filler text"
text="filler text"
multiline="true"
name="Info"
style="flex-direction: column; font-size: 14px; height: 100px; margin-left: 5px; margin-right: 5px; margin-top: 3px; margin-bottom: 3px;"
/>
</ui:VisualElement>
</ui:VisualElement>
</ui:VisualElement>
</ui:ScrollView>
</ui:VisualElement>
</ui:VisualElement>
</ui:UXML>
记得先把.cs 脚本中将使用 C#和 USS 添加的两个 Hello World 的代码注释掉或者删除
实现的效果就是这样的:
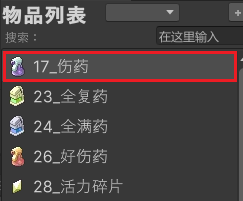
每条物品的显示模板
这样还没有完,还需要设计一个在左侧列表每条道具数据展示的 Slot 模板,由道具图片+ID_Name 的文本组成
通过同样的方式,创建一个 UI Document,命名为 ItemSlotTemplate(命名无所谓)
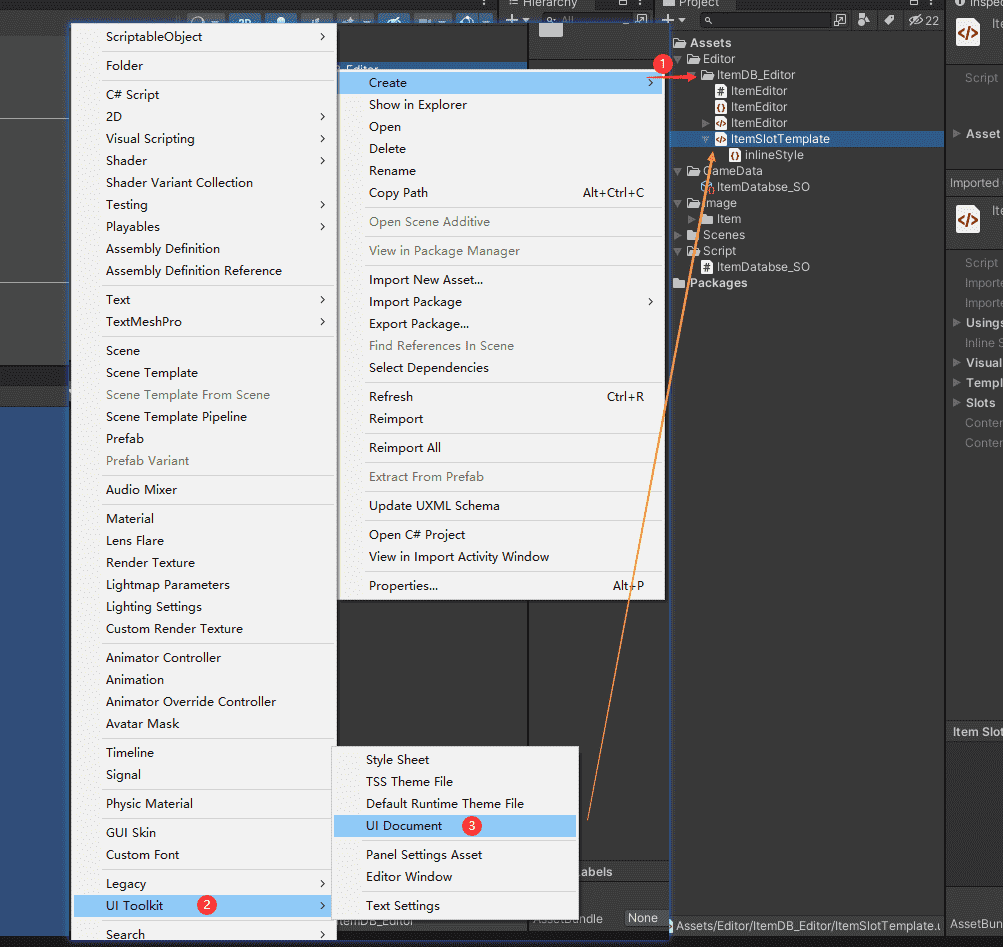
大家可以按照自己的需求自行发挥,或者参考我这个现有的。(使用方式参考上面)
<ui:UXML xmlns:ui="UnityEngine.UIElements" xmlns:uie="UnityEditor.UIElements" xsi="http://www.w3.org/2001/XMLSchema-instance" engine="UnityEngine.UIElements" editor="UnityEditor.UIElements" noNamespaceSchemaLocation="../../../UIElementsSchema/UIElements.xsd" editor-extension-mode="False">
    <ui:VisualElement name="Row" style="height: 50px; -unity-text-align: middle-left; justify-content: flex-start; flex-direction: row; align-items: center;">
        <ui:VisualElement name="Icon" style="background-image: none; width: 30px; height: 30px; -unity-text-align: middle-left; align-items: flex-start; justify-content: flex-start; flex-direction: column; -unity-font-definition: none;" />
        <ui:Label text="Label" display-tooltip-when-elided="true" name="Name" style="font-size: 16px;" />
    </ui:VisualElement>
</ui:UXML>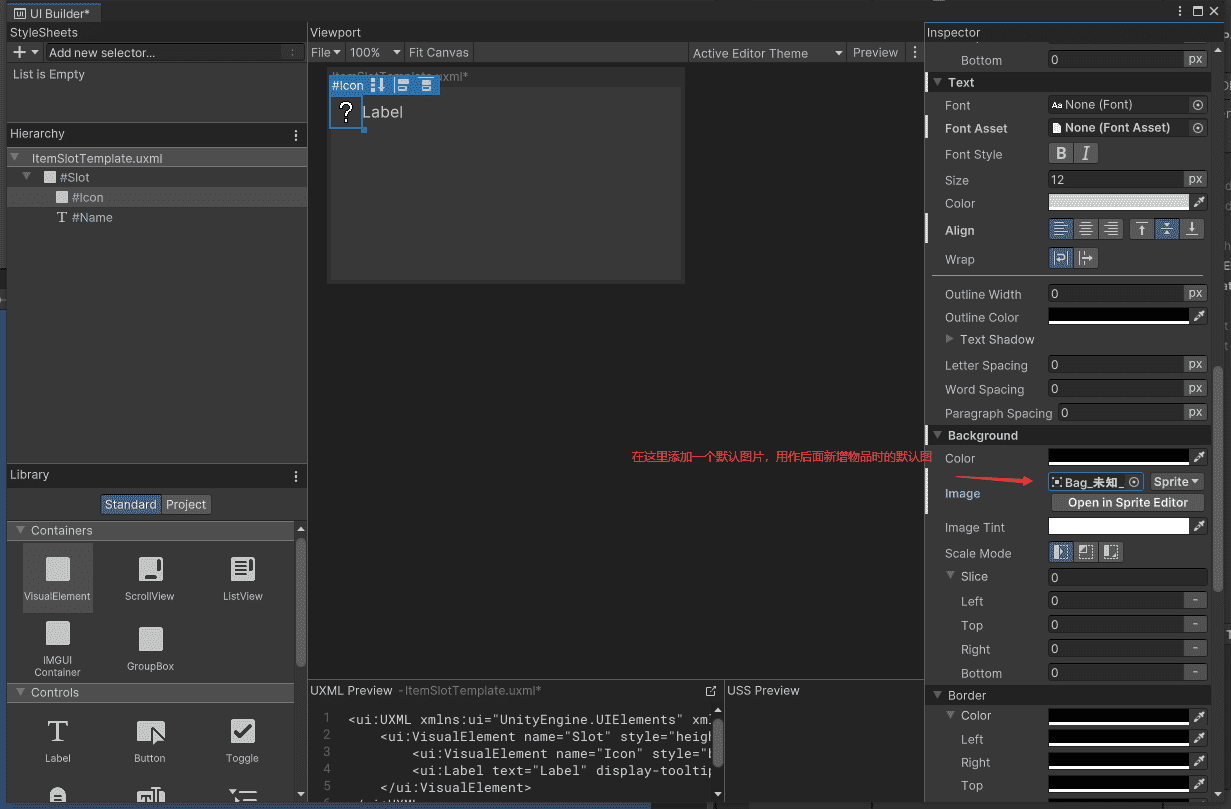
这些弄完设计界面的工作就做完了,下面开始实现功能。
功能实现
显示左侧的物品列表
读取 ItemDatabase_SO 中所有物品数据,然后显示在左侧区域
首先声明变量(List 的命名空间 using System.Collections.Generic;)
private ItemDatabse_SO dataBase;            // 受到编辑的ScriptableObject文件
private List<Item> itemList;                // 当前编辑器展示的列表数据
private VisualTreeAsset itemRowTemplate;    // 物品列表中 每条物品的模板文件
private ListView itemListView;              // 左侧的物品列表视图
private ScrollView itemDetailsSection;      // 右侧信息面板视图
private Item activeItem;                    // 当前选择激活的道具

// *默认预览图片
private Sprite defaultIcon;
private VisualElement iconPreview;          // 展示图标的视图组件
在 CreateGUI() 方法中输入以下代码,–注意获取模板和图片路径要改成你项目中的路径–
// 拿到物品列表中 物品的模板
itemRowTemplate = AssetDatabase.LoadAssetAtPath<VisualTreeAsset>("Assets/Editor/ItemDB_Editor/ItemSlotTemplate.uxml");
// 拿到默认Icon图片
defaultIcon = AssetDatabase.LoadAssetAtPath<Sprite>("Assets/Image/item/Bag_未知_Sprite.png");

// 变量赋值-获取对应的组件
itemListView = root.Q<VisualElement>("Left").Q<ListView>("ListView");
itemDetailsSection = root.Q<ScrollView>("ScrollView");
iconPreview = itemDetailsSection.Q<VisualElement>("Icon");创建两个方法,LoadDataBase() 和 GenerateListView() ,Func 和 Action 需要引入 using System; 命名空间的
// *加载基本数据
private void LoadDataBase()
{
    // 在本地Asset资源中查找名字是 ItemDatabse_SO 的文件路径,需要替换为你自己的ScriptableObject数据名称
    var dataArray = AssetDatabase.FindAssets("ItemDatabse_SO");
    if (dataArray.Length > 0)
    {
        var path = AssetDatabase.GUIDToAssetPath(dataArray[0]);
        // 通过路径加载ScriptableObject数据文件
        dataBase = (ItemDatabse_SO)AssetDatabase.LoadAssetAtPath(path, typeof(ItemDatabse_SO));
    }

    itemList = dataBase.itemList;
    // 保存数据,如果不标记则无法保存数据
    EditorUtility.SetDirty(dataBase);
}

// *生成ListView中的数据
private void GenerateListView()
{
    Func<VisualElement> makeItem = () => itemRowTemplate.CloneTree();    // 复制

    Action<VisualElement, int> bindItem = (e, i) =>
    {
        if (i < itemList.Count)
        {
            if (itemList[i].image != null)
                e.Q<VisualElement>("Icon").style.backgroundImage = itemList[i].image.texture;
            e.Q<Label>("Name").text = itemList[i] == null ? "No Name" : itemList[i].id + "_" + itemList[i].itemName;
        }
    };

    itemListView.itemsSource = itemList;    // 源文件
    itemListView.makeItem = makeItem;
    itemListView.bindItem = bindItem;

    // 右侧信息面板不可见
    itemDetailsSection.visible = false;
}
这两个方法需要放到 CreateGUI() 中执行
// 加载数据
LoadDataBase();

// 生成ListView
GenerateListView();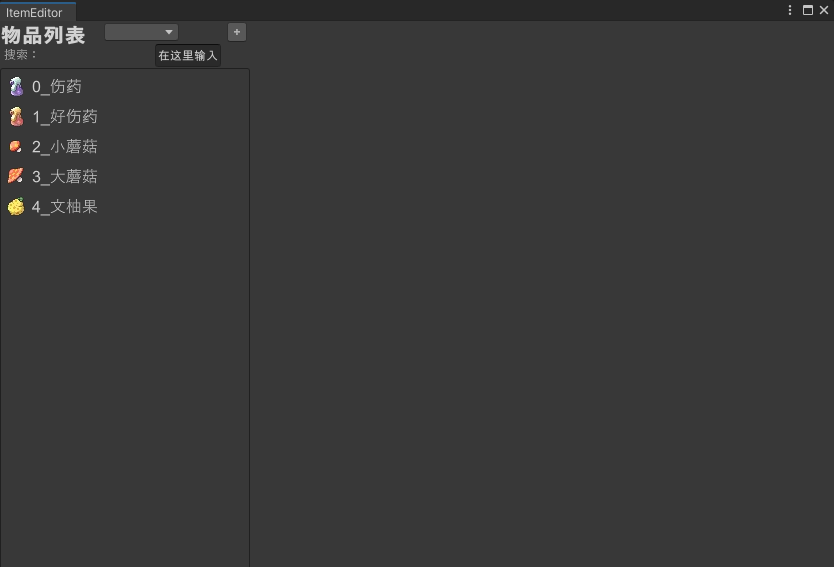
右侧的物品信息展示
创建 OnListSelectionChange() 和 GetItemDetails() 两个方法
// 当选择列表中物品时触发
private void OnListSelectionChange(IEnumerable<object> selectedItem)
   {
       activeItem = (Item)selectedItem.First();
       GetItemDetails();
       EditorUtility.SetDirty(dataBase);
       itemDetailsSection.visible = true;
   }
OnListSelectionChange() 需要在 GenerateListView() 生成物品列表方法中添加触发函数
// 当点击物品时触发
itemListView.onSelectionChange += OnListSelectionChange;
需要先确认一下你的编辑器其中这几个需要展示修改的数据组件名是什么
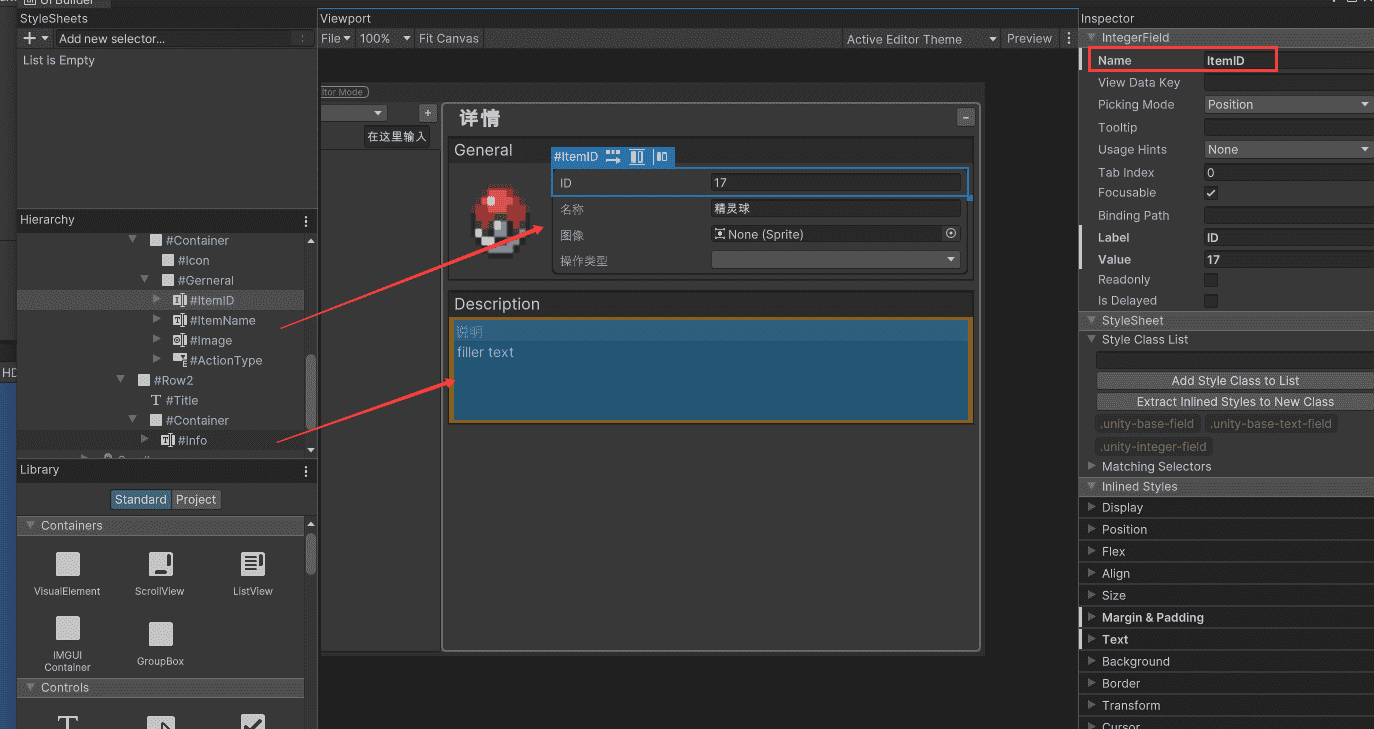
然后方便通过 Q<组件类>(“组件名”)来获取它们,(IEnumerable<> First()的命名空间 using System.Linq;)
// *获取物品的详情数据
   private void GetItemDetails()
   {
       itemDetailsSection.MarkDirtyRepaint();

       itemDetailsSection.Q<IntegerField>("ItemID").value = activeItem.id;
       // 回调函数 如果有更改数据,随之更新
       itemDetailsSection.Q<IntegerField>("ItemID").RegisterValueChangedCallback(evt =>
       {
           // 然后把选中物品的id改为输入框中的新值
           activeItem.id = evt.newValue;
       });

       itemDetailsSection.Q<TextField>("ItemName").value = activeItem.itemName;
       itemDetailsSection.Q<TextField>("ItemName").RegisterValueChangedCallback(evt =>
       {
           activeItem.itemName = evt.newValue;
           itemListView.Rebuild();
       });

       itemDetailsSection.Q<EnumField>("ActionType").Init(activeItem.actionType);
       itemDetailsSection.Q<EnumField>("ActionType").value = activeItem.actionType;
       itemDetailsSection.Q<EnumField>("ActionType").RegisterValueChangedCallback(evt =>
       {
           activeItem.actionType = (ItemActionType)evt.newValue;
       });

       iconPreview.style.backgroundImage = activeItem.image == null ? defaultIcon.texture : activeItem.image.texture;
       itemDetailsSection.Q<ObjectField>("Image").value = activeItem.image;
       itemDetailsSection.Q<ObjectField>("Image").RegisterValueChangedCallback(evt =>
       {
           Sprite newIcon = evt.newValue as Sprite;
           activeItem.image = newIcon;
           // 这里是更新预览图的组件
           itemDetailsSection.Q<VisualElement>("Icon").style.backgroundImage = newIcon == null ? defaultIcon.texture : newIcon.texture;
           itemListView.Rebuild();
       });

       itemDetailsSection.Q<TextField>("Info").value = activeItem.details;
       itemDetailsSection.Q<TextField>("Info").RegisterValueChangedCallback(evt =>
       {
           activeItem.details = evt.newValue;
       });
   }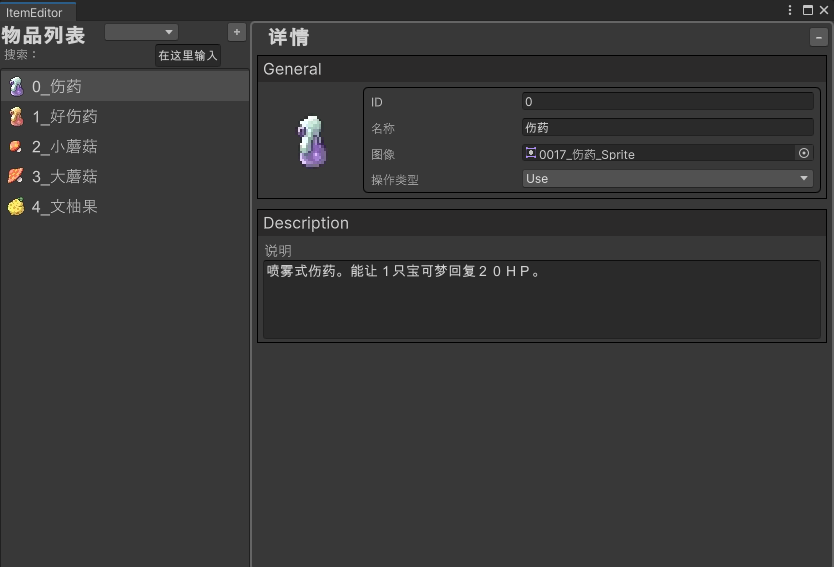
这样就可以实现显示和修改 ScriptableObject 中的物品列表数据了!
添加物品
当然需要先添加一个添加的按钮了,并且记住这个 Button 的 Name,便于后面代码获取。
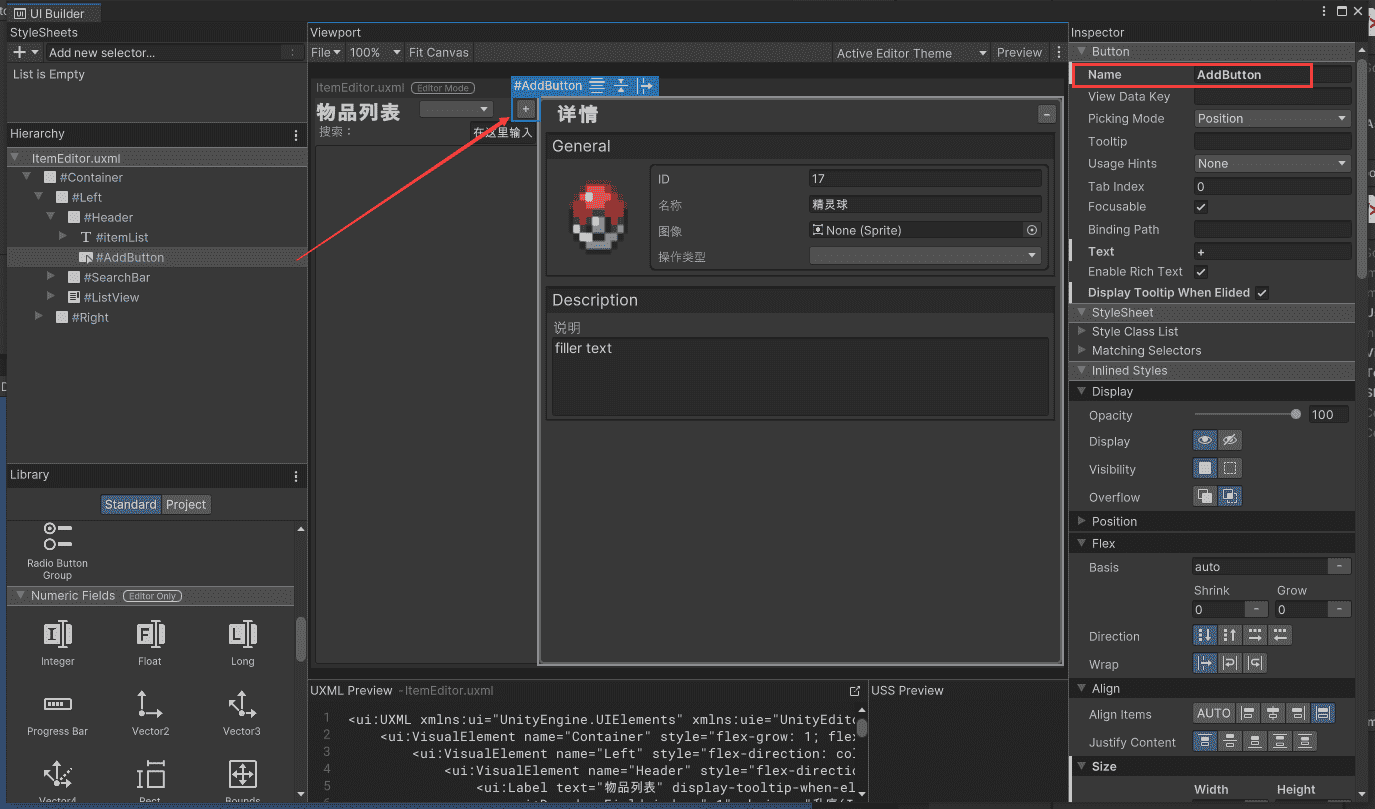
在 CreateGUI() 中获取添加按钮的 Button 并且添加点击触发事件函数
root.Q<Button>("AddButton").clicked += OnAddItemClicked;然后来写 OnAddItemClicked()
private void OnAddItemClicked()
{
    Item newItem = new Item();
    newItem.id = itemList[itemList.Count - 1].id + 1; // 当前列表中最后一个物品的ID往后+1
    newItem.itemName = "New Item";

    itemList.Add(newItem);
    itemListView.Rebuild();
}
好的,然后打开编辑器测试一下,成功添加!

删除物品
同样添加一个删除的 Button
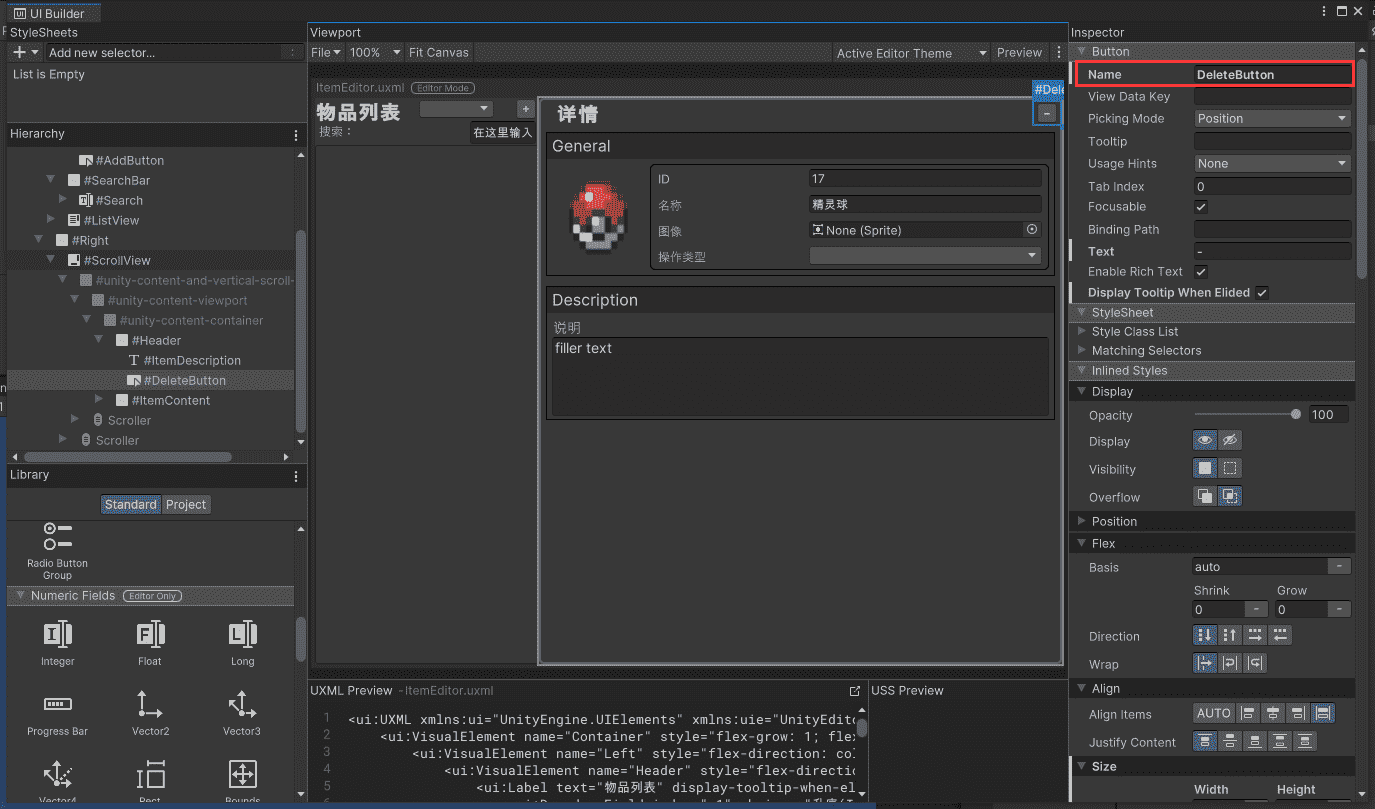
在 CreateGUI() 中获取删除按钮的 Button 并且添加点击触发事件函数
root.Q<Button>("DeleteButton").clicked += OnDelItemClicked;然后来写 OnDelItemClicked()
private void OnDelItemClicked()
{
    itemList.Remove(activeItem);
    itemListView.Rebuild();
    itemDetailsSection.visible = false;
}
打开编辑器测试一下,也删除成功!
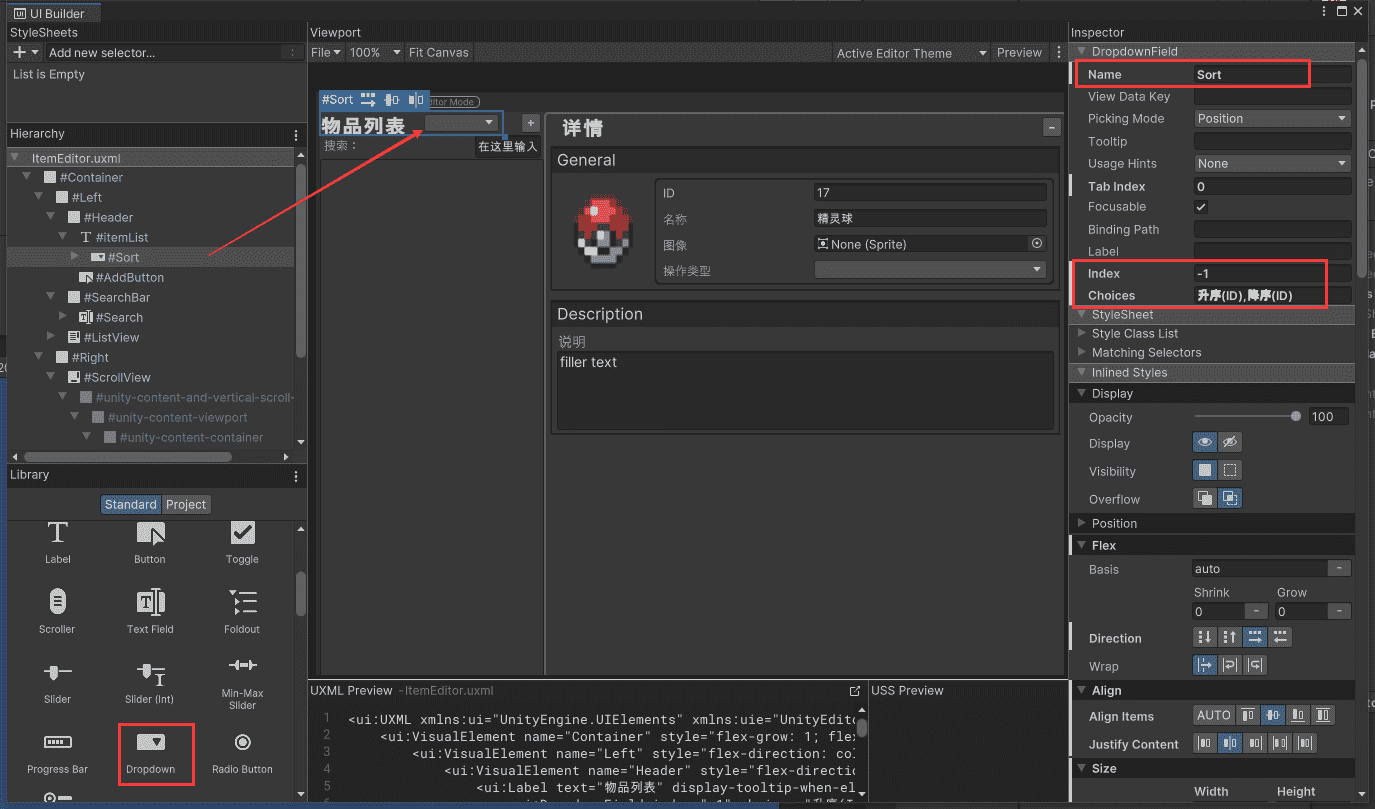
列表排序
在编辑器添加一个 Dropdown 的组件,有下拉框的功能,其中有两个属性的参数需要注意
Index:是在打开编辑器时默认选择的下拉列表中选项的索引,这里默认的-1 代表什么都不选为空,如果是 0 则是选择下拉列表中第一个选项
Choices:下拉列表中的选项,中间用英文逗号”,”隔开
先声明三个变量
private DropdownField sortDropdown;         // 排序的下拉框组件
private string[] sortMode;                  // 所有排序模式
private string currentSortMode;             // 当前的排序模式
在 CreateGUI() 中对声明的那三个变量赋值,并给下拉框注册回调函数事件,
// 列表排序
sortDropdown = root.Q<DropdownField>("Sort");
sortDropdown.RegisterValueChangedCallback(OnSortModeChange);	// 当值发生变化时调用
sortMode = sortDropdown.choices.ToArray();
currentSortMode = sortDropdown.choices[0];
// *物品列表排序
private void OnSortModeChange(ChangeEvent<string> evt)
{
currentSortMode = evt.newValue;
//? 升序(按ID)
if (evt.newValue == sortMode[0])
{
// 先降序排序
itemList.Sort(delegate (Item a, Item b)
{
return ((a.id > b.id) ? 1 : -1);
});
}
//? 降序(按ID)
else if (evt.newValue == sortMode[1])
{
// 降序排序
itemList.Sort(delegate (Item a, Item b)
{
return ((b.id > a.id) ? 1 : -1);
});
}
GenerateListView();
}打开编辑器测试一下,成功!
搜索
老样子,先添加 Text Field 组件,是一个文本+输入框的组合,正好符合基础搜索框的条件。

在 CreateGUI() 中为搜索栏注册回调函数事件
// 物品搜索栏
root.Q<TextField>("Search").RegisterValueChangedCallback<string>(OnSearchBarTextChange);// *搜索物品
private void OnSearchBarTextChange(ChangeEvent<string> evt)
{
if (evt.newValue != string.Empty || evt.newValue != "")
itemList = dataBase.SearchItemBy_ID_ItemName(evt.newValue);
else
itemList = dataBase.itemList;
GenerateListView();
}里面涉及到了对物品数据库调用的方法,我们到 ScriptableObject 数据文件中创建一个存储查询物品列表的变量和 SearchItemBy_ID_ItemName() 方法。
List<Item> searchItems = new List<Item>(); // 存储查询到的新物品列表
/// <summary>
/// 使用ID或者名称查询物品 模糊查询
/// </summary>
/// <param name="searchStr">输入查询的字符串</param>
/// <returns></returns>
public List<Item> SearchItemBy_ID_ItemName(string searchStr) {
// 如果查询物品列表不为空,就先将它清空
if(searchItems.Count != 0)
searchItems.Clear();
// 使用foreach循环遍历
foreach (var item in itemList)
{
// 如果当前遍历的道具id或者name,含有输入的字符,就将它添加到查询列表中
if(item.id.ToString().Contains(searchStr) || item.itemName.Contains(searchStr))
searchItems.Add(item);
}
return searchItems;
}OK,然后我们再打开编辑器测试一下,没有问题
完整源码
一定要注意脚本文件名要和类名一致!! 还有里面文件的路径不一定和你自己项目中的文件路径一致,包括组件名
ItemEditor.cs
using System;
using System.Linq;
using System.Collections.Generic;
using UnityEditor;
using UnityEngine;
using UnityEngine.UIElements;
using UnityEditor.UIElements;
public class ItemEditor : EditorWindow
{
private ItemDatabse_SO dataBase; // 受到编辑的ScriptableObject文件
private List<Item> itemList; // 当前编辑器展示的列表数据
private VisualTreeAsset itemRowTemplate; // 物品列表中 每条物品的模板文件
private ListView itemListView; // 左侧的物品列表视图
private ScrollView itemDetailsSection; // 右侧信息面板视图
private Item activeItem; // 当前选择激活的道具
private TextField searchBar; // 搜索栏
private DropdownField sortDropdown; // 排序的下拉框
private string[] sortMode; // 所有排序模式
private string currentSortMode; // 当前的排序模式
// *默认预览图片
private Sprite defaultIcon;
private VisualElement iconPreview; // 展示图标的视图组件
[MenuItem("My Editor/ItemEditor")] // 这个编辑器的菜单层级位置
public static void ShowExample()
{
ItemEditor wnd = GetWindow<ItemEditor>();
wnd.titleContent = new GUIContent("ItemEditor");
}
public void CreateGUI()
{
// Each editor window contains a root VisualElement object
VisualElement root = rootVisualElement;
/** 因为我只使用了UXML没有用到UCSS所以就删了,其实注释掉也可以 **/
// Import UXML
var visualTree = AssetDatabase.LoadAssetAtPath<VisualTreeAsset>("Assets/Editor/ItemDB_Editor/ItemEditor.uxml");
VisualElement labelFromUXML = visualTree.Instantiate();
root.Add(labelFromUXML);
// 拿到物品列表中 物品的模板
itemRowTemplate = AssetDatabase.LoadAssetAtPath<VisualTreeAsset>("Assets/Editor/ItemDB_Editor/ItemSlotTemplate.uxml");
// 拿到默认Icon图片
defaultIcon = AssetDatabase.LoadAssetAtPath<Sprite>("Assets/Image/item/Bag_未知_Sprite.png");
// 变量赋值-获取组件
itemListView = root.Q<VisualElement>("Left").Q<ListView>("ListView");
itemDetailsSection = root.Q<ScrollView>("ScrollView");
iconPreview = itemDetailsSection.Q<VisualElement>("Icon");
// 物品搜索栏
root.Q<TextField>("Search").RegisterValueChangedCallback<string>(OnSearchBarTextChange);
// 列表排序
sortDropdown = root.Q<DropdownField>("Sort");
root.Q<DropdownField>("Sort").RegisterValueChangedCallback(OnSortModeChange);
sortMode = sortDropdown.choices.ToArray();
currentSortMode = sortDropdown.choices[0];
// 获得按钮
root.Q<Button>("AddButton").clicked += OnAddItemClicked;
root.Q<Button>("DeleteButton").clicked += OnDelItemClicked;
// 加载数据
LoadDataBase();
// 生成ListView
GenerateListView();
}
// *搜索物品
private void OnSearchBarTextChange(ChangeEvent<string> evt)
{
if (evt.newValue != string.Empty || evt.newValue != "")
{
itemList = dataBase.SearchItemBy_ID_ItemName(evt.newValue);
}
else
{
itemList = dataBase.itemList;
}
GenerateListView();
}
// *物品列表排序
private void OnSortModeChange(ChangeEvent<string> evt)
{
    currentSortMode = evt.newValue;

    //? 升序(按ID)
    if (evt.newValue == sortMode[0])
    {
        // 先降序排序
        itemList.Sort(delegate (Item a, Item b)
        {
        	return ((a.id > b.id) ? 1 : -1);
        });
    }
    //? 降序(按ID)
    else if (evt.newValue == sortMode[1])
    {
        // 降序排序
        itemList.Sort(delegate (Item a, Item b)
        {
        	return ((b.id > a.id) ? 1 : -1);
        });
    }

    GenerateListView();
}
// *加载基本数据
private void LoadDataBase()
{
// 在本地Asset资源中查找名字是 ItemDatabse_SO 的文件路径
var dataArray = AssetDatabase.FindAssets("ItemDatabse_SO");
if (dataArray.Length > 0)
{
var path = AssetDatabase.GUIDToAssetPath(dataArray[0]);
// 通过路径加载ScriptableObject数据文件
dataBase = (ItemDatabse_SO)AssetDatabase.LoadAssetAtPath(path, typeof(ItemDatabse_SO));
}
itemList = dataBase.itemList;
// 如果不标记则无法保存数据
EditorUtility.SetDirty(dataBase);
}
// *生成ListView中的数据
private void GenerateListView()
{
Func<VisualElement> makeItem = () => itemRowTemplate.CloneTree(); // 复制
Action<VisualElement, int> bindItem = (e, i) =>
{
if (i < itemList.Count)
{
if (itemList[i].image != null)
e.Q<VisualElement>("Icon").style.backgroundImage = itemList[i].image.texture;
e.Q<Label>("Name").text = itemList[i] == null ? "No Name" : itemList[i].id + "_" + itemList[i].itemName;
}
};
itemListView.itemsSource = itemList; // 源文件
itemListView.makeItem = makeItem;
itemListView.bindItem = bindItem;
// 当点击物品时触发
itemListView.onSelectionChange += OnListSelectionChange;
// 右侧信息面板不可见
itemDetailsSection.visible = false;
}
#region 按钮事件
private void OnDelItemClicked()
{
itemList.Remove(activeItem);
itemListView.Rebuild();
itemDetailsSection.visible = false;
}
private void OnAddItemClicked()
{
Item newItem = new Item();
newItem.id = itemList[itemList.Count - 1].id + 1; // 当前列表中最后一个物品的ID往后+1
newItem.itemName = "New Item";
itemList.Add(newItem);
itemListView.Rebuild();
}
#endregion
private void OnListSelectionChange(IEnumerable<object> selectedItem)
{
activeItem = (Item)selectedItem.First();
GetItemDetails();
EditorUtility.SetDirty(dataBase);
itemDetailsSection.visible = true;
}
// *获取物品的详情数据
private void GetItemDetails()
{
itemDetailsSection.MarkDirtyRepaint(); //
itemDetailsSection.Q<IntegerField>("ItemID").value = activeItem.id;
// 回调函数 如果有更改数据,随之更新
itemDetailsSection.Q<IntegerField>("ItemID").RegisterValueChangedCallback(evt =>
{
activeItem.id = evt.newValue;
});
itemDetailsSection.Q<TextField>("ItemName").value = activeItem.itemName;
itemDetailsSection.Q<TextField>("ItemName").RegisterValueChangedCallback(evt =>
{
activeItem.itemName = evt.newValue;
itemListView.Rebuild();
});
itemDetailsSection.Q<EnumField>("ActionType").Init(activeItem.actionType);
itemDetailsSection.Q<EnumField>("ActionType").value = activeItem.actionType;
itemDetailsSection.Q<EnumField>("ActionType").RegisterValueChangedCallback(evt =>
{
// Debug.Log(evt.newValue);
activeItem.actionType = (ItemActionType)evt.newValue;
});
iconPreview.style.backgroundImage = activeItem.image == null ? defaultIcon.texture : activeItem.image.texture;
itemDetailsSection.Q<ObjectField>("Image").value = activeItem.image;
itemDetailsSection.Q<ObjectField>("Image").RegisterValueChangedCallback(evt =>
{
Sprite newIcon = evt.newValue as Sprite;
activeItem.image = newIcon;
// 这里是更新预览图的组件
itemDetailsSection.Q<VisualElement>("Icon").style.backgroundImage = newIcon == null ? defaultIcon.texture : newIcon.texture;
itemListView.Rebuild();
});
itemDetailsSection.Q<TextField>("Info").value = activeItem.details;
itemDetailsSection.Q<TextField>("Info").RegisterValueChangedCallback(evt =>
{
activeItem.details = evt.newValue;
});
}
}ItemDatabse_SO.cs
using System.Collections.Generic;
using UnityEngine;
[CreateAssetMenu(fileName = "ItemDatabse_SO", menuName = "ScriptableObject/ItemDatabse_SO")]
public class ItemDatabse_SO : ScriptableObject
{
public List<Item> itemList;
List<Item> searchItems = new List<Item>();      // 存储查询到的新物品列表

/// <summary>
/// 使用ID或者名称查询物品 模糊查询
/// </summary>
/// <param name="searchStr">输入查询的字符串</param>
/// <returns></returns>
public List<Item> SearchItemBy_ID_ItemName(string searchStr) {

    // 如果查询物品列表不为空,就先将它清空
    if(searchItems.Count != 0)
        searchItems.Clear();

    // 使用foreach循环遍历
    foreach (var item in itemList)
    {
        // 如果当前遍历的道具id或者name,含有输入的字符,就将它添加到查询列表中
        if(item.id.ToString().Contains(searchStr) || item.itemName.Contains(searchStr))
            searchItems.Add(item);
    }

    return searchItems;
}
}
// *道具
[System.Serializable]
public class Item
{
// 我这是演示所以尽量用的不同的数据类型展示
public int id;
public string itemName;
public Sprite image;
public ItemActionType actionType;
[TextArea] public string details;
}
// *物品操作类型
public enum ItemActionType
{
None, // 无操作
Use // 使用
}